
This has been a headache! I pulled out the engine a long time ago (as you can see from the date of the post below). The block has been sitting in Frank's Engine Rebuild shop for 7 weeks. A friend of mine said "It's starting to sound like a bad joke." Every time I call, the mechanic there has some excuse as to why it's not ready. I'm a reasonable person, and I've experienced circumstances beyond my control that cause me to miss deadlines, but 7 weeks? Not acceptable. I'm finally going to get the block back tomorrow and install it Saturday (hopefully). I'm working on steering Friday and moving into our house next week (yay), so I may not get to installing it for a while.
Anyway, I had them pressure test the heads and block. The heads were no good. The heads had cracks right behind the seats, and were basically trash. The block was mostly OK. It was warped from overheating. The cylinders were wavy, so I had to have it bored to 4.040". I didn't want to go to 4.060", despite that being more common, because I don't want to worry about heating issues. This means my little 327ci is now a 333ci. (2.02r x 3.25h) x 8 = 333.4 I installed Keith Black forged dome pistons and polished up the crank and cam. I also bought some 461 camel hump 2.02 heads through an ad on Craigslist. The heads are in great shape and are ready to bold onto the block. Pete Jackson Timing Gear Drive to replace the timing chain. This thing is going to be fast and LOUD!
I've also been performing some minor wiring work (horn, wipers, cockpit lights, etc) that I'll rant about after I finish the work later this week.
I also ordered some new steering parts. New inner tie rod ends, outer tie rod ends, dust boots, grease seals, and link kit for the steering arms. Also got a new worm gear, gaskets, bushings, bearings, races and seals for the steering box. I should install those before the engine (easier), so I'm shooting for Friday to work on the steering.
Tuesday, October 19, 2010
Monday, August 2, 2010
Engine Pull
So we finally got around to pulling the engine. Odie, a friend of the family, sent over his friend Bill, who's some sort of engine Jedi. The guy diagnosed the problem within 10 seconds, after hearing it turn over a couple of times.


We set out to rent a hoist while Bill began to disconnect everything. Disconnecting everything was a pretty simple and straightforward process.


After everything was disconnected and the hoist arrived, we hooked up a chain to the block and began to hoist the engine out.


We mounted the engine to an engine stand and began to take off the intake and the heads.


Turns out, some knucklehead had the inside painted with Rustoleum, which was flaking terribly. The valve covers came off, then the heads.


Guess what we found when the heads came off? There was water/coolant completely flooding three of the 8 cylinders. (Note for the non-gearheads: that's not good). We drained them and began to do some investigating.


Headgaskets were blown on both sides. The flaky rustoleum made everything all funk of a gooey gunk. We're not sure which came first: the flakes or the blown gasket. The good news is that it's an easy fix. Also good news was the fact that someone had the engine bored .030" over and put in some really slick forged pistons (read: more power). We also found out that it's got really nice headers that cost someone a fortune. (I keep saying "someone" because I have no idea who has owned this thing in the last 42 years it's been around)


We still need to pull it apart the rest of the way, but it's downhill from here. We're going to get everything machined: have the cylinders honed, have the heads pressure tested and machined, re-seat all of the valves, redo the bearing and the shafts. I figure I'll get everything painted while the engine is out. I'm going to get a big box of stuff to take to the powder coater to get media blasted and coated hi-temp black.
More updates to come.
The rest of the pictures are in the engine removal album, and other pictures can be found in the gallery.
We set out to rent a hoist while Bill began to disconnect everything. Disconnecting everything was a pretty simple and straightforward process.
After everything was disconnected and the hoist arrived, we hooked up a chain to the block and began to hoist the engine out.
We mounted the engine to an engine stand and began to take off the intake and the heads.
Turns out, some knucklehead had the inside painted with Rustoleum, which was flaking terribly. The valve covers came off, then the heads.
Guess what we found when the heads came off? There was water/coolant completely flooding three of the 8 cylinders. (Note for the non-gearheads: that's not good). We drained them and began to do some investigating.
Headgaskets were blown on both sides. The flaky rustoleum made everything all funk of a gooey gunk. We're not sure which came first: the flakes or the blown gasket. The good news is that it's an easy fix. Also good news was the fact that someone had the engine bored .030" over and put in some really slick forged pistons (read: more power). We also found out that it's got really nice headers that cost someone a fortune. (I keep saying "someone" because I have no idea who has owned this thing in the last 42 years it's been around)
We still need to pull it apart the rest of the way, but it's downhill from here. We're going to get everything machined: have the cylinders honed, have the heads pressure tested and machined, re-seat all of the valves, redo the bearing and the shafts. I figure I'll get everything painted while the engine is out. I'm going to get a big box of stuff to take to the powder coater to get media blasted and coated hi-temp black.
More updates to come.
The rest of the pictures are in the engine removal album, and other pictures can be found in the gallery.
Sunday, May 23, 2010
Sad times
The engine was running really hot and kind of stupid, so I did a compression test. Bad compression on 6/8 cylinders. There was also water in the oil, and lots of thick, white smoke billowing out of the tail pipes.

So now I get to save up to buy new head gaskets (cheap), resurface the cylinder heads (cheap), and while I'm at it, I may as well replace the intake and exhaust valves (cheap) and the rocker arms (cheap). Add 10 hours to get the thing all apart, replace the pieces, and back together (expensive), and I'm not going to be working on this beast for a while.

Head gasket: FAIL
Friday, May 7, 2010
Spring cleaning
After 42 years of cruising, showing off in front of girls, racing on PCH, and sitting in a garage covered in dust, the car has gotten pretty dirty. And not just in the usual places.
I decided that it was time to start cleaning out the grime. I tackled two major areas: inside the doors, and under the hood.
First, the doors. This is what they looked like when I started:
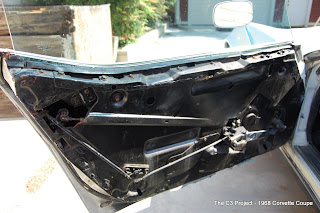
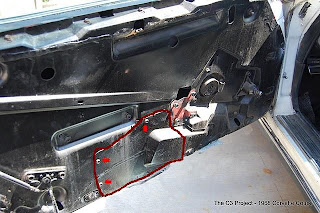
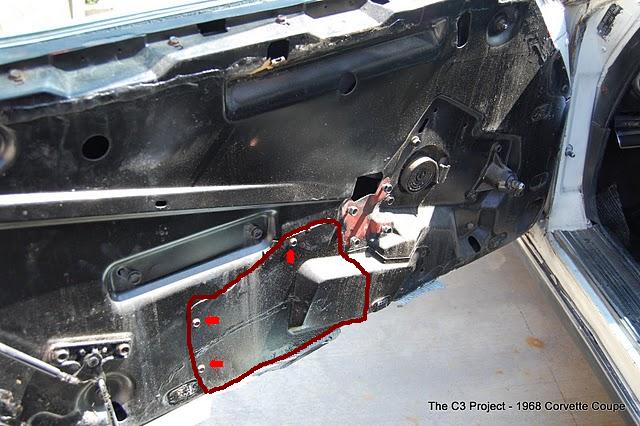
Underneath the door panel lies an array or levers, hinges, rods and pins that control the door latch mechanism so I can open the door from inside or outside. The mechanism worked OK, but the sludge needed to go. There really isn't much to it; just start taking pieces off and cleaning them. I used two cans of Gumout Carburetor cleaner and a brass-bristle brush. The carb cleaner works great because it has a very strong jet spray to force junk off, and because it's basically super concentrated petrol and it eats away gunk. Just a little bit of scrubbing does wonders.
The most difficult part was getting everything out of the door. Not just detached from the door, but actually out from inside the door. I sat there and fought with it for 20 minutes before I realized something: the door had a trap door built just for the purpose and getting things out.
Here's the engine before:

I decided that it was time to start cleaning out the grime. I tackled two major areas: inside the doors, and under the hood.
First, the doors. This is what they looked like when I started:

Notice the layers of sludge.
The most difficult part was getting everything out of the door. Not just detached from the door, but actually out from inside the door. I sat there and fought with it for 20 minutes before I realized something: the door had a trap door built just for the purpose and getting things out.
Durrr.
So once I figured that out, it was easy. The whole process of taking it apart, cleaning out the pieces, and putting them back in took about 25 minutes per door (minus durrr time).
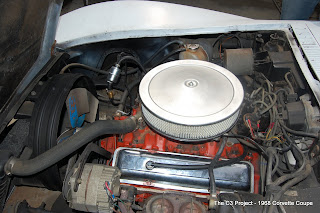
After that, it was time to clean the engine. Autozone had a sale, 4 cans of engine cleaner for $10. My kind of deal. I also got some aluminum foil at the 99¢ store.
Here's the engine before:

Notice the half inch of crap all over.
I wrapped the foil around any parts that might not do well with getting water all over them. The air filter, distributor, and other wired areas were covered under the foil. It certainly wasn't waterproof, but I wasn't planning on hitting those areas directly.
Once everything was wrapped, I sprayed generous amounts of cleaner all over the place. I got in every nook and cranny. (What the heck are nooks and crannies, anyway?) After letting it sit for 15 minutes as per the directions on the can, I went to town on the dirties spots with an old toothbrush, or possibly my brother's toothbrush that I took without his knowledge. Scrub scrub scrub. This is what it looked like when I was done:

Purdy.
Monday, April 19, 2010
Parking Brake
The parking brake wasn't working when I bought the car, so I decided to tackle that next. Sorry, but there are no pictures - there was hardly enough room for me under the car, let alone a camera and enough distance to get a shot that was more than a blur of rust-colored haze.
Anyway, I jacked the car up, got on my super cool Chinese-made creeper I got at Harbor Freight for like 80 cents, and rolled under the brake lever. If you've been under any old car, you know what the parking brake cables look like: "Y"
It was actually a super easy fix. The cables were in good shape, the springs were in place, and the brake lever itself worked fine. The cables just needed to be tightened, so I could get more tension when I pulled the brake lever. This in turn would engage the brake. I tightened the pull cable using the nuts already in place. I turned them away from the spring, so there would be more tension on the cable, but it wasn't enough. I needed a way to increase tension on the cable going from the Y to the wheels.
A buddy of mine offered me a short length of 3/4" brass tubing. I disconnected the tension spring, took off the locknuts, and slid the tube over the threaded rod. I put the nuts and spring back on. Essentially, this made the my thread rod a few inches longer - perfect for getting the extra 3 inches of travel I needed to get the tension right. After some minor adjusting and testing, the tension is just right. Now I can park on on an incline without worrying about rolling into things!
Total cost for fixing parking brake: $4.28 for Slurpees and a Chico Stick for my buddy who gave me the brass tube
Saturday, April 17, 2010
Images and steering couplings
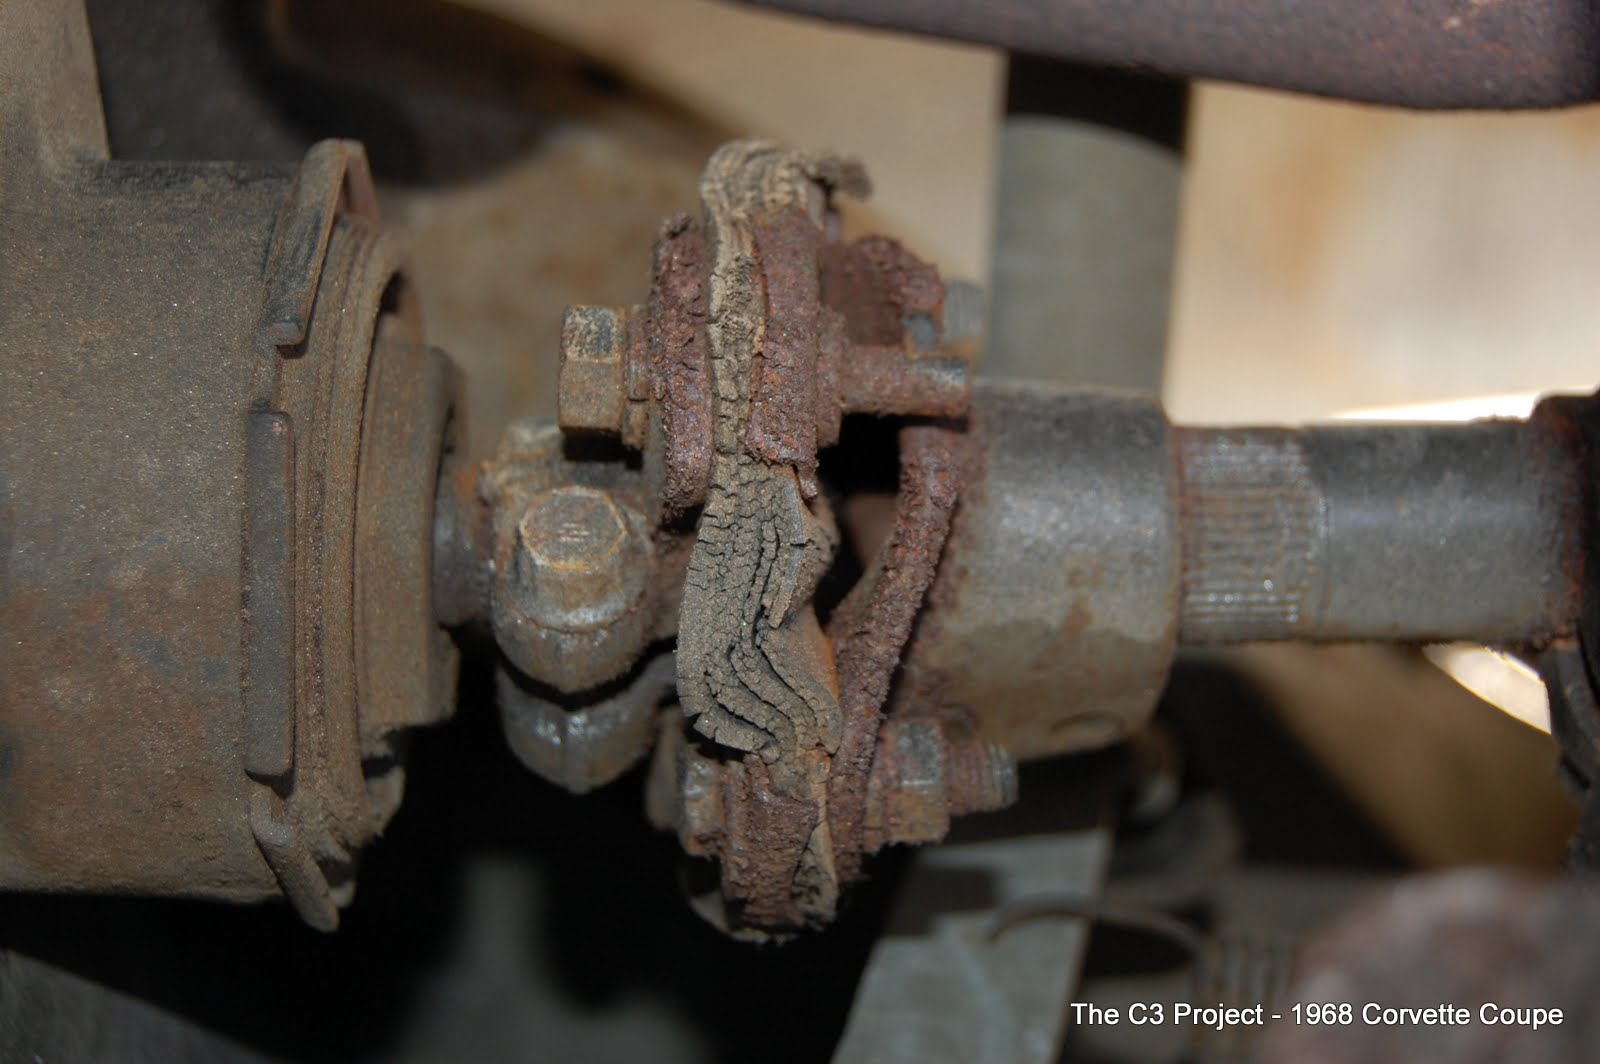
So I drove the car over to my pops' house so I could take the wheels off and look at the parking brake, which isn't working correctly. I took some pictures while I was there, all of which can be found in the gallery. While I was taking pictures, my brother noticed something. The "flexible steering shaft coupling assembly" (rag joint) was all fubar.
 It looks all bent and broken and broken, but it's supposed to be like that. The problem is that the bolts aren't the right kind, and the rubber part is all brittle and mangled. Someone bought a cheap overseas repair kit to fix it sometime over the last 42 years, and didn't do it right.
I went hunting all over the internets to find out what the part was called, how to get a new one, etc. Thanks to Jim Shea and the guys at the Corvette Forum, I was able to track down the GM part numbers for a 1968 Corvette Coupe. The coupling is part number 7806391. The pinch bolts (to mount the coupler to the steering shaft) are part number 7807271. I ordered them today, so hopefully they arrive in time to work on it Saturday.
New rag joint and pins: $102
I never did get around to fixing the parking brake. Turns out, whoever owned the thing before I did put on some wheel lock nuts (lug nuts that need a special tool to be taken off, so no one steals the rims). Of course, when I bought the car over 120 miles away, the guy didn't give me the special tool. We spent the majority of the day trying to figure out how to get the stupid lug nuts off without damaging anything important. In the end, a Dremel grind wheel and brute force got it done. The two rear wheels are done, but whenever I get around to taking off the front wheels, I'll have to Dremel and fight with it again.
New, non-pain-in-the-butt lug nuts: $5
Finally, I looked at the braking system and found out what was wrong, but that's another day (and paycheck).
Monday, April 12, 2010
The C3 Project
My name is Steven. This blag is going to be a record of the C3 Project. The C3 Project is a car project. A C3 is a particular generation of Chevrolet Corvette. It's the third generation of Corvette, thus, C3.
A few days ago (April 7, 2010) I bought a 1968 C3 Corvette. I bought it near San Diego, CA on a clear spring day. I got a good deal on it. It's a numbers matching, all original Corvette (numbers matching means the frame, transmission, and engine are all original, from the same car, no parts have been changed). The C3 Project will document the process of restoring this C3 to nice and shiny. I am going to do my best to take pictures of everything. I plan on taking pictures before I begin working on a particular piece, as I work on it, and after it's done.

Expect to see this blag get filled with updates, pictures, complaints about shoddy wiring, and all sorts of other restoration-relevant information. Hopefully, before too long, the C3 will be pretty and nice.
Subscribe to:
Comments (Atom)


